If the floor in front of your front or back door always feels cold, the problem is probably not your heating system. It is the threshold — the strip the door closes against at the bottom. When that strip is worn, loose, or badly fitted, cold air pours in all winter, warm air escapes in summer, and rooms never hold a steady temperature. The good news is that threshold insulation is one of the cheapest home improvements you can make. Most fixes cost $15 to $75, take an hour or two, and need only basic tools. This guide explains where leaks happen, how to find them, which threshold to choose, and how to fit and maintain it.
How Door Thresholds Leak Air
A threshold bridges the gap between the door bottom and the floor, and compresses against a seal to block air and water. Leaks start when either job fails. The rubber insert hardens and cracks with age, so it no longer springs back. Screws work loose, the strip warps, and a slot opens up — sometimes only 3 to 5 millimetres wide, but running the full width of the doorway. That is roughly equal to leaving a small window open.
Air also slips around the ends of the threshold where it meets the frame, and through the joint between the sill and the subfloor. Wind pushes cold air into those side gaps, while the stack effect in a heated house — warm air rising and escaping upstairs — pulls cold air in at ground level.
Diagnosing Drafts and Air Leaks
Do not buy anything until you know where the air is coming in. A new threshold will not help if the real leak is a split seal up the frame. Try these checks on a cold or windy day:
- Hand test: Run your palm slowly along the bottom edge and corners of the closed door. A cool stream marks the leak.
- Paper test: Shut the door on a sheet of paper at several points. If it pulls out with no resistance, the seal is not compressing there.
- Light test: At night, have someone shine a torch along the outside while you look from inside. Any line of light is a direct air path.
- Incense test: Hold a lit incense stick near the threshold on a windy day. Smoke that bends or streams sideways shows the leak and its strength.
Also inspect the threshold itself. Press the rubber insert — it should feel flexible, not brittle. Look for cracked sealant at the ends, rusty screws, rot in a timber sill, and a floor that has dropped away from the strip. Note whether the gap is even. A gap wider at one end usually means the door has dropped on its hinges or the floor is uneven, and that changes which solution will work.
Threshold Types and Materials
Measure your doorway and the existing strip before you shop. Most doors need a threshold about 900 millimetres (36 inches) long and 90 to 150 millimetres wide, trimmed to length with a hacksaw. The main types are:
- Adjustable thresholds: The best choice for most homes. A central rail rises or lowers on screws, by about 8 millimetres, so you can fine-tune the fit. Expect to pay $25 to $60.
- Fixed saddle thresholds: A solid metal strip with no moving seal. Cheap ($12 to $25) and tough, but they rely on the door bottom seal to do the airtight work.
- Interlocking thresholds: A hook on the door engages with a channel in the sill as it closes. The seal is excellent, but fitting must be precise.
- Low-profile thresholds: Shallow strips, under 12 millimetres high, for wheelchair access or differing floor levels. Pair them with a door sweep, as they seal less on their own.
For materials, aluminium is the common default: light, rust-resistant, and durable. Hardwood thresholds look right in older homes and can be sanded and resealed, but they cost more, typically $35 to $80. Composite and PVC thresholds resist moisture completely and suit wet entrances. Whichever you choose, pick a model with a replaceable rubber insert — when the seal wears out in five to eight years, you can swap a $6 insert instead of the whole threshold.
Weatherstripping Options That Complete the Seal
A threshold only seals the bottom. The sides and top need weatherstripping that meets it neatly at the corners, with no gaps at the joins:
- Foam tape: Self-adhesive and very cheap ($5 to $10 a roll). Fine for a quick fix, but it compresses flat within a year or two.
- V-strip: A folded plastic or bronze strip that springs open to fill the gap. Durable and discreet.
- Kerf-in seals: A rubber fin that pushes into a groove in the frame. Soft, long-lasting, and easy to replace.
- Silicone bulb seals: Hollow tubes that compress gently, forgive uneven gaps, and stay flexible in cold weather.
Budget $15 to $40 to reseal a whole doorway. Replace any weatherstripping that is torn or flattened, and overlap it slightly into the threshold seal rather than leaving a butt joint that can open up.
Installation Steps for a New Threshold
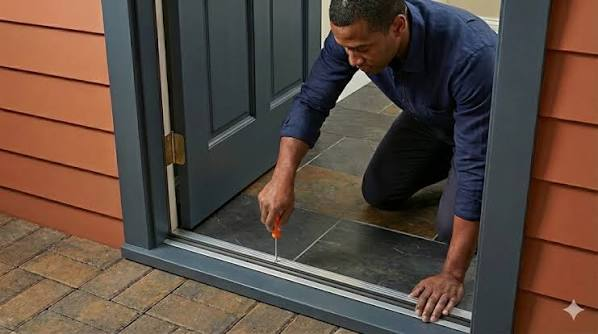
You will need a tape measure, hacksaw, drill-driver, utility knife, exterior sealant, and a pry bar. Allow one to two hours for your first replacement.
Remove the Old Threshold and Prepare the Opening
Unscrew the old strip. If it is stuck down with sealant, cut along both edges with a utility knife and lever it up with the pry bar. Scrape off old sealant, sweep out grit, and check the subfloor and frame bottom for rot. Replace any soft timber now — a new threshold over a rotten sill will never sit flat. Test-fit the new threshold dry, mark the length, and trim it.
Fit, Seal, and Adjust the New Threshold
- Run two beads of exterior sealant along the underside, near each edge. This bedding blocks air and water underneath — skipping it is the most common cause of a new threshold that still leaks.
- Set the threshold in place, press it down evenly, and drive the screws home without overtightening, which can bow the strip.
- On an adjustable model, raise the rail until the door just brushes the seal with light, even pressure — slight resistance, not a hard push.
- Seal both ends where the threshold meets the frame with a small bead of sealant, and wipe away any squeeze-out underneath.
- Retest with the paper test at five or six points. Adjust individual screws until the grip is even everywhere.
Leave the sealant to cure, usually 24 hours. On the next windy evening, repeat the hand test — the cold strip on the floor should be gone.
Sealing Gaps and Adding Under-Door Sweeps
Sometimes the threshold is sound but a gap remains — where an old floor dips, or a door was trimmed short for thick carpet that has since been removed. A door sweep usually solves this. It is a strip of aluminium or timber with a rubber or brush fin that screws to the inside face of the door bottom. Most cost $10 to $30 and fit in 15 minutes: cut to width and fix it so the fin just touches the threshold with the door closed.
Brush sweeps cope best with uneven floors, because the bristles flex over bumps. Rubber-blade sweeps seal better on smooth thresholds. For a larger gap of 15 to 20 millimetres, use a door shoe — a U-shaped channel wrapping the door bottom with a thick vinyl seal — or an automatic drop-down seal. Fill remaining hairline gaps at the sides with exterior sealant.
Maintenance and Seasonal Checks
Give the threshold ten minutes of attention twice a year, in autumn and again in spring:
- Clean the threshold with a stiff brush — grit under the seal holds the door open a fraction and chews up the rubber.
- Wipe the rubber insert and check for cracks or flattening. Replace it as soon as it hardens.
- Tighten the screws and, on adjustable thresholds, raise the rail a quarter-turn if the paper test shows the grip has softened.
- Renew cracked or peeling sealant at the ends and underneath edges before water gets in and swells the subfloor.
- Check the door still latches easily. If you have to slam it, the rail is too high — back it off rather than forcing the door.
Timber thresholds need their varnish or oil refreshed every couple of years.
Final Thoughts
The gap under an exterior door is one of the easiest heat losses to fix well. Diagnose first, choose an adjustable threshold with a replaceable insert, bed it properly in sealant, and complete the job with sound weatherstripping and, if needed, a sweep. For $30 to $75 and a couple of hours, you remove a permanent cold spot, make temperatures steadier, and take a small but real slice off heating and cooling bills. You will feel the difference every time you walk through the door.
Frequently Asked Questions
How much does it cost to insulate a door threshold?
Most homeowners spend $15 to $75. A fixed threshold costs $12 to $25, an adjustable model $25 to $60, and a sweep $10 to $30, plus about $8 for sealant. Professional fitting adds $75 to $150.
Can I stop a draft under my door without replacing the threshold?
Yes, often. If the threshold itself is solid and level, fitting a door sweep or a thicker door-bottom seal usually closes the gap. Adhesive foam tape is a temporary option for renters. Replace the threshold only if it is cracked, rotten, loose, or badly uneven.
How do I adjust an adjustable threshold?
Open the door and turn the large screws along the centre rail — clockwise usually raises it. Make quarter-turns, close the door, and repeat the paper test until the seal grips evenly along the whole width. Raise it too far and the door will stick or refuse to latch.
What is the difference between a door sweep and a threshold?
The threshold is fixed to the floor under the door and the door closes against it. A sweep is fixed to the door itself and moves with it, its rubber or brush fin wiping across the threshold. Used together, they give two lines of defence against drafts.
When should I call a professional instead of doing it myself?
Call a carpenter or door specialist if the sill or subfloor is rotten, the frame has moved so the door no longer sits square, or the gap is wider at one end by more than about 10 millimetres. Those are alignment or structural problems, and a new threshold alone will not seal them.