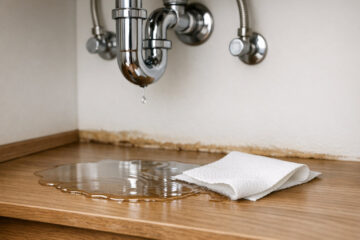
The cabinet under a kitchen or bathroom sink is easy to ignore — and expensive to repair once water gets in. A slow drip can run for weeks behind cleaning bottles, soaking the cabinet floor, swelling particleboard, and feeding mold before you ever see a puddle. By the time the base feels soft or smells musty, a loose fitting can mean a new cabinet, damaged flooring, and a plumbing bill as well.
The good news is that these leaks almost always give warning signs, and catching them early is simple. You need no specialist tools: a flashlight, a few minutes of looking and feeling in the right order, an inexpensive water alarm, and a short monthly routine will find most problems while the fix is still a tightened nut, a $5 washer, or a fresh bead of sealant.
How Under-Sink Leaks Start
Most under-sink leaks come from connections, not bursting pipes. Pressurized supply lines bring hot and cold water to the faucet, while drain parts carry water away. Every joint is a potential drip point as washers harden, threads corrode, and vibration works fittings loose.
Supply lines are riskiest because they are under pressure constantly. Braided hoses and their rubber washers typically last 8 to 10 years before stiffening. Angle-stop valves left untouched for years can weep around the stem, and faucet tailpieces and sprayer hoses loosen gradually, dripping only when the tap runs.
Drain leaks only appear while water drains, so they are easy to miss with the tap off. The P-trap, slip-joint nuts, and tailpiece are the usual sources. Garbage disposals add vibration that can crack the mounting seal, and dishwasher hoses and in-sink filters are common culprits too. Splashes, a failed countertop seal, and condensation can also mimic a leak.
Visual Inspection Techniques That Find Slow Leaks
Empty the cabinet completely — you cannot inspect what you cannot see, and stored items hide stains. Wipe the floor dry, then work from the top down with a bright flashlight. Look at the underside of the sink and countertop for rust streaks, green or white corrosion, and dark water tracks. Follow each supply line, then every drain joint. Fresh leaks look shiny and wet; older ones leave mineral crust, swollen wood, bubbled paint, or black staining.
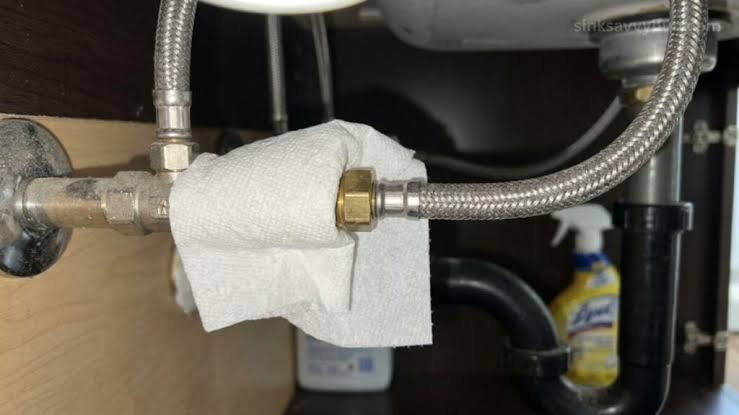
The Dry Paper and Tissue Test
Press a dry paper towel firmly around each fitting in turn — supply connections, trap joints, disposal mount, and valve stems — for 20 to 30 seconds. Even slight dampness shows as a dark spot. For an intermittent drain leak, fill the sink, then release the water while watching the trap. Note which joint wets first, because water runs downhill and the lowest wet point is rarely the source.
- Check after heavy use, not first thing in the morning — drain leaks only appear when water flows.
- Photograph tight corners behind the trap with a phone camera and flash if you cannot see them directly.
- Trust your nose: a musty smell with no visible water usually means hidden moisture in the back panel or floor.
Leak Detection Sensors and Alarms Worth Installing
A sensor watches continuously, turning a silent drip into an immediate alert. Basic battery alarms cost about $10 to $20, sit flat on the cabinet floor, and sound an 85- to 100-decibel alarm when water touches their contacts. They need only a battery changed once a year.
Smart sensors cost roughly $30 to $60, connect to Wi-Fi, and send a phone alert wherever you are. Models from Govee, YoLink, and Ring also warn of low battery and freezing temperatures — valuable for rentals, vacation homes, or rarely used bathrooms. Place the sensor at the lowest point of the floor, usually toward the back under the trap. In a wide cabinet, use two: one under the valves, one under the drain.
Automatic shutoff systems that monitor flow at the main line cost $400 to $800 plus labor and suit homes with a history of leaks. For most households, point sensors give nearly all the benefit for under $50. Test yours monthly with a wet finger.
Cabinet and Plumbing Inspection: What to Touch, Not Just See
Run a dry fingertip slowly around every joint and along the underside of each pipe. Dampness, stickiness, and gritty mineral deposits are easier to feel than see in shadow. Try each slip-joint nut and supply connection by hand: snug is right — hand-tight plus a small turn for trap nuts — but never force plastic nuts, which crack when overtightened.
Inspect the cabinet itself, too. Press firmly on the floor, especially at the back corners and around pipe holes. Sound material feels solid; damaged particleboard feels spongy, crumbles at the edges, or looks wavy. Check the back panel for dark rings and the side walls for tide lines showing how high water has pooled before.
- Shut-off test: turn each valve fully off and on twice a year so it works in an emergency, watching the stem for weeping.
- Disposal check: run cold water with the unit on and watch the mount, inlets, and base for drips or rust.
- Hose check: cracking, bulging, or rust on supply braiding means replace the line now, typically $8 to $15 each.
If you find moisture with no clear source, dry everything, lay cardboard on the floor, and check after normal use. The first wet mark points to the leaking joint faster than replacing parts at random.
Sealing and Caulking Joints to Keep Splash Water Out
Many wet cabinets are not leaking from pipes at all. Water splashed onto the countertop runs to the back edge or pools around the faucet base and seeps through a failed seal. Check where the sink rim meets the countertop, where the countertop meets the backsplash, and around the faucet base. Cracked, shrunken, or black-molded caulk has stopped working.
To reseal, cut away all old caulk, clean with denatured alcohol, and let the joint dry fully. Tape both sides, lay a smooth bead of 100 percent silicone kitchen-and-bath sealant — about $8 to $12 a tube — tool it with a wet finger, and remove the tape. Let it cure 24 hours before soaking the area. Silicone will not stick to old silicone residue, so full removal matters.
Also seal around pipes where they pass through the cabinet back or floor. This will not stop a plumbing leak, but it keeps a small spill out of the wall cavity and subfloor and blocks pests. Never caulk trap joints or supply nuts, though — those fittings must stay removable for repair.
Moisture-Resistant Cabinet Upgrades That Buy You Time
You cannot make a standard cabinet waterproof, but you can make a small leak visible early and far less destructive. A fitted under-sink mat or tray, about $20 to $40, is the simplest upgrade. A waterproof mat with a raised lip contains spills, protects the floor panel, and pushes water forward where you will notice it, instead of letting it soak silently into the back corners.
- Line the floor with waterproof shelf liner or vinyl flooring offcuts for a cheap, wipe-clean barrier over bare particleboard.
- Seal raw edges and pipe cutouts with clear polyurethane — exposed edges absorb water fastest.
- Replace a ruined floor with exterior-grade plywood or a PVC mat, not another sheet of unsealed particleboard.
- Leave gaps behind stored items for airflow; a cabinet packed solid dries very slowly after splashes.
When you next replace a cabinet, consider plywood-box construction or a waterproof synthetic floor — often only $50 to $150 more. Until then, a mat, sealed edges, and a sensor give similar protection.
Maintenance and Early Warning Routines
Detection works best as a habit, not a project. A two-minute monthly check is enough: shine a light in, feel the trap and supply joints, glance at the sensor, and look for new stains or odors. Tie it to a monthly task you already do so it happens. Twice a year, do the fuller version — empty the cabinet, run the tissue test, exercise the valves, and test the alarm.
- Monthly: visual check, touch test on joints, and confirm the sensor battery is healthy.
- Every six months: hand-tighten trap nuts, inspect hoses, and check caulk at the rim and backsplash.
- Annually: replace sensor batteries, replace supply hoses older than 8 years, and photograph the interior to track its condition.
- After any plumbing work: recheck disturbed joints after one day and again after one week.
Between checks, act on warning signs the same day: a sudden musty smell, a cabinet door that no longer closes evenly, bubbling flooring in front of the sink, or an unexplained rise in your water bill.
Final Thoughts
Under-sink leaks are rarely sudden disasters. They are slow, quiet, and predictable — which makes them preventable. Learn where the joints are, look and feel around them regularly, put a $15 alarm where water pools, and keep seals and the cabinet floor in good shape. Two minutes a month protects a cabinet that can cost $600 or more to replace, plus the floor beneath it.
Frequently Asked Questions
How often should I check under my sink for leaks?
Check quickly once a month, and do a fuller inspection — emptying the cabinet and testing each joint with a dry tissue — every six months. Look sooner if you notice a musty smell, a stain, or a change in water pressure.
What should I do first when I find water under the sink?
Turn off the valves under the sink, dry the area, and place a tray to catch drips. Then run the tap and drain separately to learn whether the leak is from a supply line or the drain before tightening or replacing parts.
Where is the best place to put a leak sensor?
Lay it flat at the lowest point of the cabinet floor, usually toward the back beneath the trap and valves, where water collects first. In a wide cabinet, use two sensors to cover both the supply and drain sides.
Can a small leak really cause mold?
Yes. Mold can start on damp wood and drywall within 24 to 48 hours, and a hidden drip keeps material permanently wet. Fix the source, dry the cabinet promptly, and improve airflow. Extensive black staining is best assessed by a professional.
When should I call a plumber instead of fixing it myself?
Call a plumber if a shut-off valve will not close, a supply line is bulging or corroded, the leak persists after new washers and tightening, or the floor and wall are already soft. A typical visit costs about $150 to $350.