The most effective crawl space moisture control is a layered system: fix exterior drainage first, seal the ground with a heavy vapor barrier, close the vents, and run a dedicated dehumidifier to hold relative humidity below 60 percent. No single product does the whole job. Moisture reaches a crawl space from the soil, from outside air, and from water pooling at the foundation, so lasting protection means controlling all three sources in the right order.
Where Crawl Space Moisture Actually Comes From
A crawl space is wet for three different reasons, and each one needs a different fix. Ground moisture rises constantly from bare soil, even in dry weather, because the earth under a house never fully dries. Outside air enters through foundation vents and brings humid summer air that condenses on cool joists and ducts. And surface water finds its way in when grading slopes toward the house, gutters overflow, or downspouts discharge at the foundation. Most failed moisture projects attack only one of these sources, which is why the space feels damp again within a season.
The damage is slow and expensive. Wood joists and subflooring absorb moisture, lose strength, and invite mold and wood-destroying insects. Insulation sags and clumps when it gets wet, losing most of its insulating value. Ductwork in a damp crawl space leaks conditioned air and pulls musty air into the rooms above through the stack effect, which is why a wet crawl space often shows up first as a smell in the living room, not as visible water below.
What Makes Crawl Space Moisture So Damaging to a Foundation?
Moisture damages a foundation in two ways: directly, by weakening the materials themselves, and indirectly, by feeding the organisms that eat them. Concrete and masonry absorb water, and repeated wetting and freezing cycles open small cracks that grow wider each year. Wood framing in contact with damp air or wet soil is an open invitation to fungal decay and termites, and decayed sill plates and joist ends are among the most expensive structural repairs a homeowner can face. Once rot reaches the sill plate, the repair often requires jacking the house and replacing framing that should have lasted the life of the building.
Relative humidity above 60 percent is the threshold where mold growth becomes likely, so keeping the space below that line is the central goal.
Wood moisture content above roughly 20 percent invites fungal decay; healthy framing usually sits well below that level.
Standing water is the most urgent sign, because it means drainage has failed and the soil under the footings may be softening.
Musty odors upstairs, cupped hardwood floors, and sagging insulation are early warnings that the crawl space is already too wet.
The encouraging part is that moisture control is a solved problem. The methods below are proven, widely used, and durable when they are installed as a system rather than as isolated products. The order matters: control water outside first, then seal the ground, then manage the air.
Step One: Keep Water Away From the Foundation
Every crawl space project should start outside, because no interior system can keep up with water that is actively directed at the house. Grade the soil so it drops at least six inches over the first ten feet away from the foundation, and keep mulch and flower beds from forming a dam against the wall. Clean gutters twice a year and extend downspouts so they discharge at least six feet from the house, or into a drain that carries water well away from the foundation. These are the cheapest fixes in this entire guide, and they solve a surprising share of wet crawl spaces on their own.
Walk the perimeter after a heavy rain and mark every spot where water pools against the wall or runs toward the house.
Regrade low spots with compacted soil, sloping away from the foundation, and keep the top of the soil below the siding.
Extend every downspout and confirm that gutter joints are not leaking directly onto the foundation.
Consider a shallow French drain in the yard if the lot slopes toward the house and regrading alone cannot fix it.
If water still enters the crawl space after the exterior is fixed, the next step is interior drainage: a perimeter drain inside the crawl space that carries water to a sump pit, where a pump discharges it outside. A sump pump with a battery backup is worth the extra cost, because the heaviest rain often arrives with a power outage, and that is exactly when the pump is needed most.
Sealing the Ground: Vapor Barriers That Actually Work
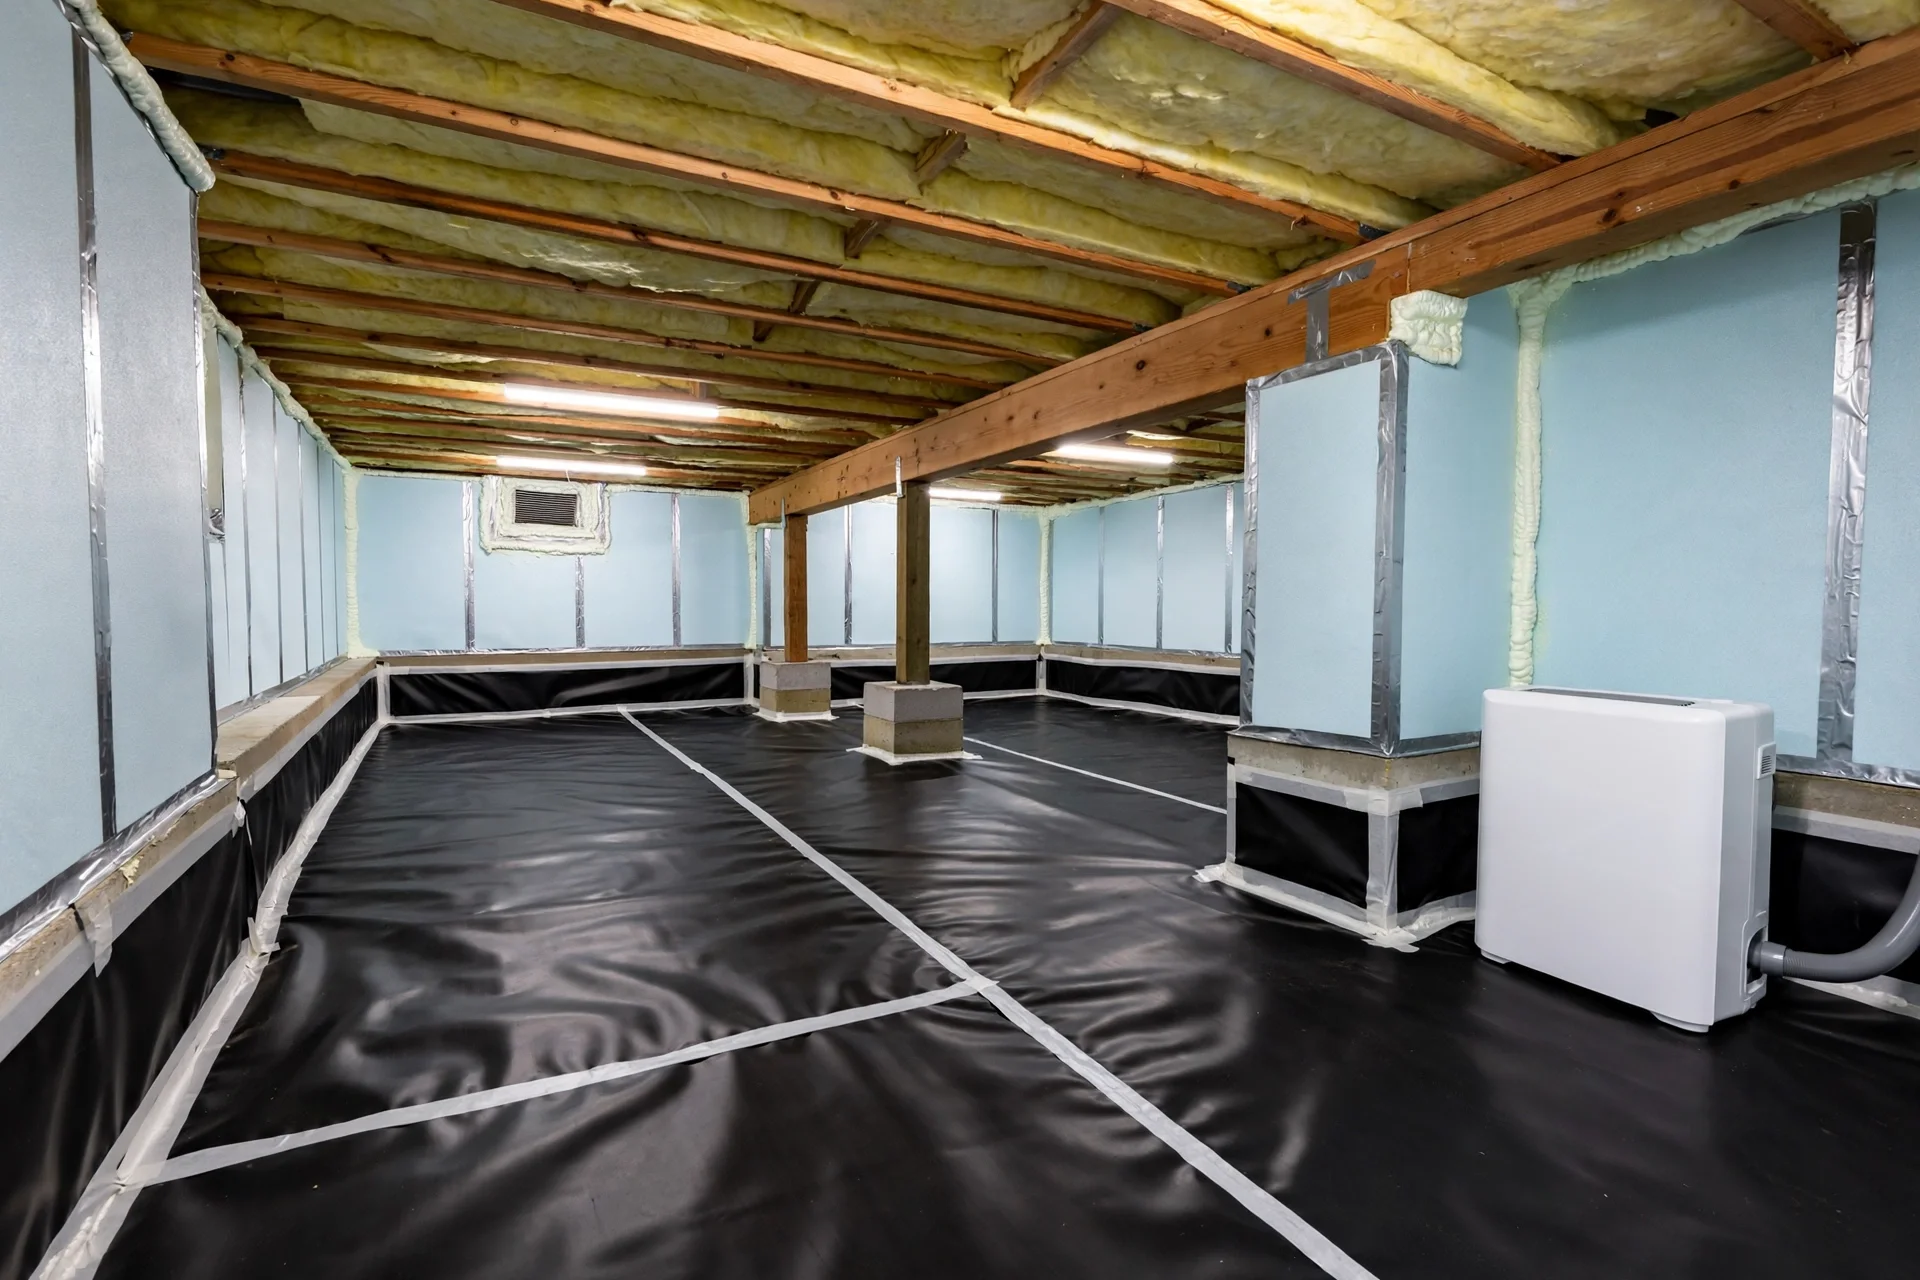
Bare soil is a constant source of water vapor, and the fix is a continuous vapor barrier across the entire floor. Building code accepts a 6-mil polyethylene sheet as a minimum, but for a durable installation most professionals use a reinforced 12-mil or 20-mil liner, because thin plastic tears during installation and at seams. The liner should run up the foundation walls, overlap at seams by at least six inches, and be sealed with vapor barrier tape so it forms one continuous membrane rather than a patchwork of sheets.
A floor-only barrier is a half measure. It slows ground vapor but leaves the walls exposed and the vents open, so humidity still enters from outside air. Full encapsulation extends the liner up the walls, seals the vents, and adds insulation and dehumidification, turning the crawl space into a dry, conditioned part of the house. The table below compares the common approaches so you can see what each one actually controls.
Cost figures here are broad estimates, because prices vary widely with the size of the space and local labor rates. A basic floor barrier may cost a few hundred dollars in materials for a do-it-yourselfer, while a professionally installed full encapsulation typically runs several thousand dollars. Treat any quote that skips the exterior drainage step with suspicion, because sealing a space that still takes on water traps the problem inside.
Closing the Vents and Conditioning the Air
Traditional crawl space vents were designed to dry the space with outside air, but in humid climates they do the opposite: they admit warm, moist air that condenses on cool wood and ducts. Sealing the vents is part of full encapsulation, and it only works when it is paired with a dehumidifier. A residential dehumidifier from a hardware store is not enough for this job; a crawl space unit is built for cool, high-humidity conditions, has automatic defrost, and drains continuously to the sump or outside so nobody has to empty a bucket.
Insulation moves in a sealed crawl space, too. Instead of insulating between the floor joists, where fiberglass batts sag and collect moisture, the walls are insulated with rigid foam board or closed-cell spray foam, which resist moisture and keep the space at a temperature close to the house above. The result is a conditioned space: warmer floors in winter, lower humidity in summer, and ductwork that no longer sweats.
While the space is open, seal the air leaks that carry moisture and conditioned air between the house and the crawl space. Rim joists are the worst offenders, so seal them with foam board and caulk or spray foam, and seal duct joints with mastic rather than cloth tape, which dries out and fails. Leaky ducts in a damp crawl space do double damage: they waste heated and cooled air, and they pull moist crawl space air into the living area through the return side. A blower-door test or a simple smoke pencil on a windy day will show you where the leaks are, and sealing them is one of the highest-value hours you can spend under a house.
Keeping the System Working Year After Year
A moisture control system needs light, regular attention to keep working. A digital hygrometer placed in the middle of the crawl space gives a continuous humidity reading, and checking it monthly takes less than a minute. Inspect the vapor barrier each year for tears, especially near access points and around piers. Test the sump pump by pouring water into the pit, clean the dehumidifier filter, and confirm that the discharge line is clear. These small checks prevent the slow drift back to dampness that ruins an otherwise good installation.
- Check the hygrometer monthly and act if humidity stays above 60 percent for more than a few days.
- Inspect the liner each spring for tears, loose seams, or standing water on top of the barrier.
- Test the sump pump before the rainy season and replace the battery backup every few years.
- Keep the access door sealed and make sure no one stores damp materials or debris in the space.
One more warning: never seal a crawl space that has an active water leak, a broken pipe, or a radon problem without addressing those first. Encapsulation over a leak hides the water and accelerates damage, and a sealed space concentrates radon if the house needs mitigation. Fix the underlying problem, then seal.
Final Thoughts: Protecting Your Foundation Starts Under the Floor
Crawl space moisture is controlled by a system, not a product: exterior drainage first, a heavy sealed vapor barrier second, closed vents and a real dehumidifier third, and simple annual checks to keep it all working. Done in that order, the investment protects the sill plates, joists, and subfloor that hold the house up, and it pays back in drier air, warmer floors, and a foundation that stays sound for decades.
Crawl Space Moisture Control FAQs
How much does crawl space encapsulation cost?
A professionally installed full encapsulation typically costs several thousand dollars, often in the range of a few thousand to well over ten thousand depending on the size of the space and the components included. A basic vapor barrier alone costs far less but controls only ground moisture.
Should crawl space vents be open or closed?
In humid climates, sealed vents plus a dehumidifier perform better than open vents, because open vents admit moist summer air that condenses on cool surfaces. In dry climates, vented spaces can work fine. The right answer depends on local humidity and whether a dehumidifier is installed.
What humidity level should a crawl space stay below?
Keep relative humidity below 60 percent, and ideally between 45 and 55 percent. Above 60 percent, mold growth becomes likely, and wood moisture content can rise toward the level where fungal decay begins.
Can I install a vapor barrier myself?
A basic floor barrier is a reasonable do-it-yourself project for a dry, accessible crawl space. Full encapsulation, sump pump installation, and spray foam insulation are usually better left to professionals, because sealing and drainage details determine whether the system works.
Does a dehumidifier alone fix a wet crawl space?
No. A dehumidifier manages airborne humidity but cannot stop ground vapor or standing water. It works as part of a system with a vapor barrier and exterior drainage, not as a replacement for them.
How do I know if my crawl space has a moisture problem?
Look for musty odors, visible mold, sagging or wet insulation, standing water, rust on metal, and wood that feels soft or shows dark staining. Cupped hardwood floors upstairs and high indoor humidity can also point to a wet crawl space below.