If pigeons are cooing and leaving droppings around your roof, the gap beneath your panels is probably already their home. Solar panel bird proofing solves the problem at its source: it closes the sheltered space under a residential photovoltaic array so birds can no longer get in to nest, while still allowing the airflow panels need to run cool. Done properly, it is a humane, lasting fix rather than endless cleaning and bird-chasing.
The most effective method is perimeter mesh screening — galvanised or powder-coated mesh fixed around the array edge with non-penetrating clips. Bird spikes, sealants, and skirts can support that barrier, but none replaces it alone. Proofing works best after existing nests and droppings have been legally cleared, and should be checked once or twice a year so small gaps never become a way back in.
Why Birds Nest Beneath Solar Panels
A rooftop array creates almost perfect nesting habitat by accident. Panels sit a few inches above the roof on mounting rails, leaving a shallow cavity that is dry in rain, shaded in summer, warm from the panels above, and safe from ground predators. To a bird, it looks like a cliff ledge — exactly the kind of site many species evolved to choose.
Why Pigeons Are the Main Problem
Pigeons cause most solar panel nesting problems because they are strongly site-faithful. Once a pair raises young under an array, they treat it as home and return repeatedly, and young raised there often nest nearby. Pigeons also breed over a long season and live in flocks, so one pair quickly becomes a colony. Sparrows, starlings, and gulls use panels too, but pigeons are larger, messier, and more persistent. Shooing birds away rarely works: removing a nest without blocking access just gives them a clean space to rebuild in.
The Damage Nesting Birds Cause
Nesting under panels is not just a noise nuisance. The damage builds quietly, mostly out of sight.
Droppings, Debris, and Lost Output
Bird droppings are acidic and corrosive. On top of the panels, they shade cells, reducing generation, and uneven shading can create hot spots that stress cells underneath. Left long enough, droppings can damage anti-reflective coatings and etch glass. Beneath the panels, droppings and debris corrode aluminium frames and hardware, spill into gutters, and block drainage so water pools where it should run away.
Wiring Damage, Heat, and Fire Risk
Birds moving, pecking, and building under an array can loosen or damage the cables beneath the panels, raising the risk of faults and short circuits. Packed twigs and feathers also trap heat around warm electrical components and restrict ventilation. Dry nesting material next to wiring is a recognised fire concern. Add early-morning cooing above bedrooms, plus mites and bacteria from droppings, and a colony becomes a household problem, not just a solar one.
Clean Before You Proof: Nests, Droppings, and the Law
Never fit mesh over an occupied nest or a dirty cavity. Sealing birds, eggs, or debris inside creates a worse problem than the one you started with, and may also break the law.
Check Whether a Nest Is Active Before Removing Anything
In many places, wild birds and their active nests are legally protected. In the UK, the Wildlife and Countryside Act 1981 makes it an offence to damage or destroy a nest while it is in use or being built. In the United States, the Migratory Bird Treaty Act protects most native nesting birds, although feral pigeons, house sparrows, and starlings are generally treated differently. Rules vary, so check your local position first. If eggs or chicks are present, leave the nest alone, do not block access to it, and wait until the young have fledged and it is confirmed empty — or ask a licensed pest controller to advise. The safest time to proof is outside the breeding season.
Clearing and Sanitising the Cavity
Once the space is legally clear, remove all nesting material, droppings, and debris from beneath and around the array, and clean the panel surfaces. Wear gloves, a dust mask, and eye protection, dampen dry droppings to reduce dust, and bag waste securely. Look for chewed cables and corroded fixings, and have any electrical damage assessed by a qualified solar installer.
Mesh Screening: The Most Effective Solar Panel Bird Proofing Method
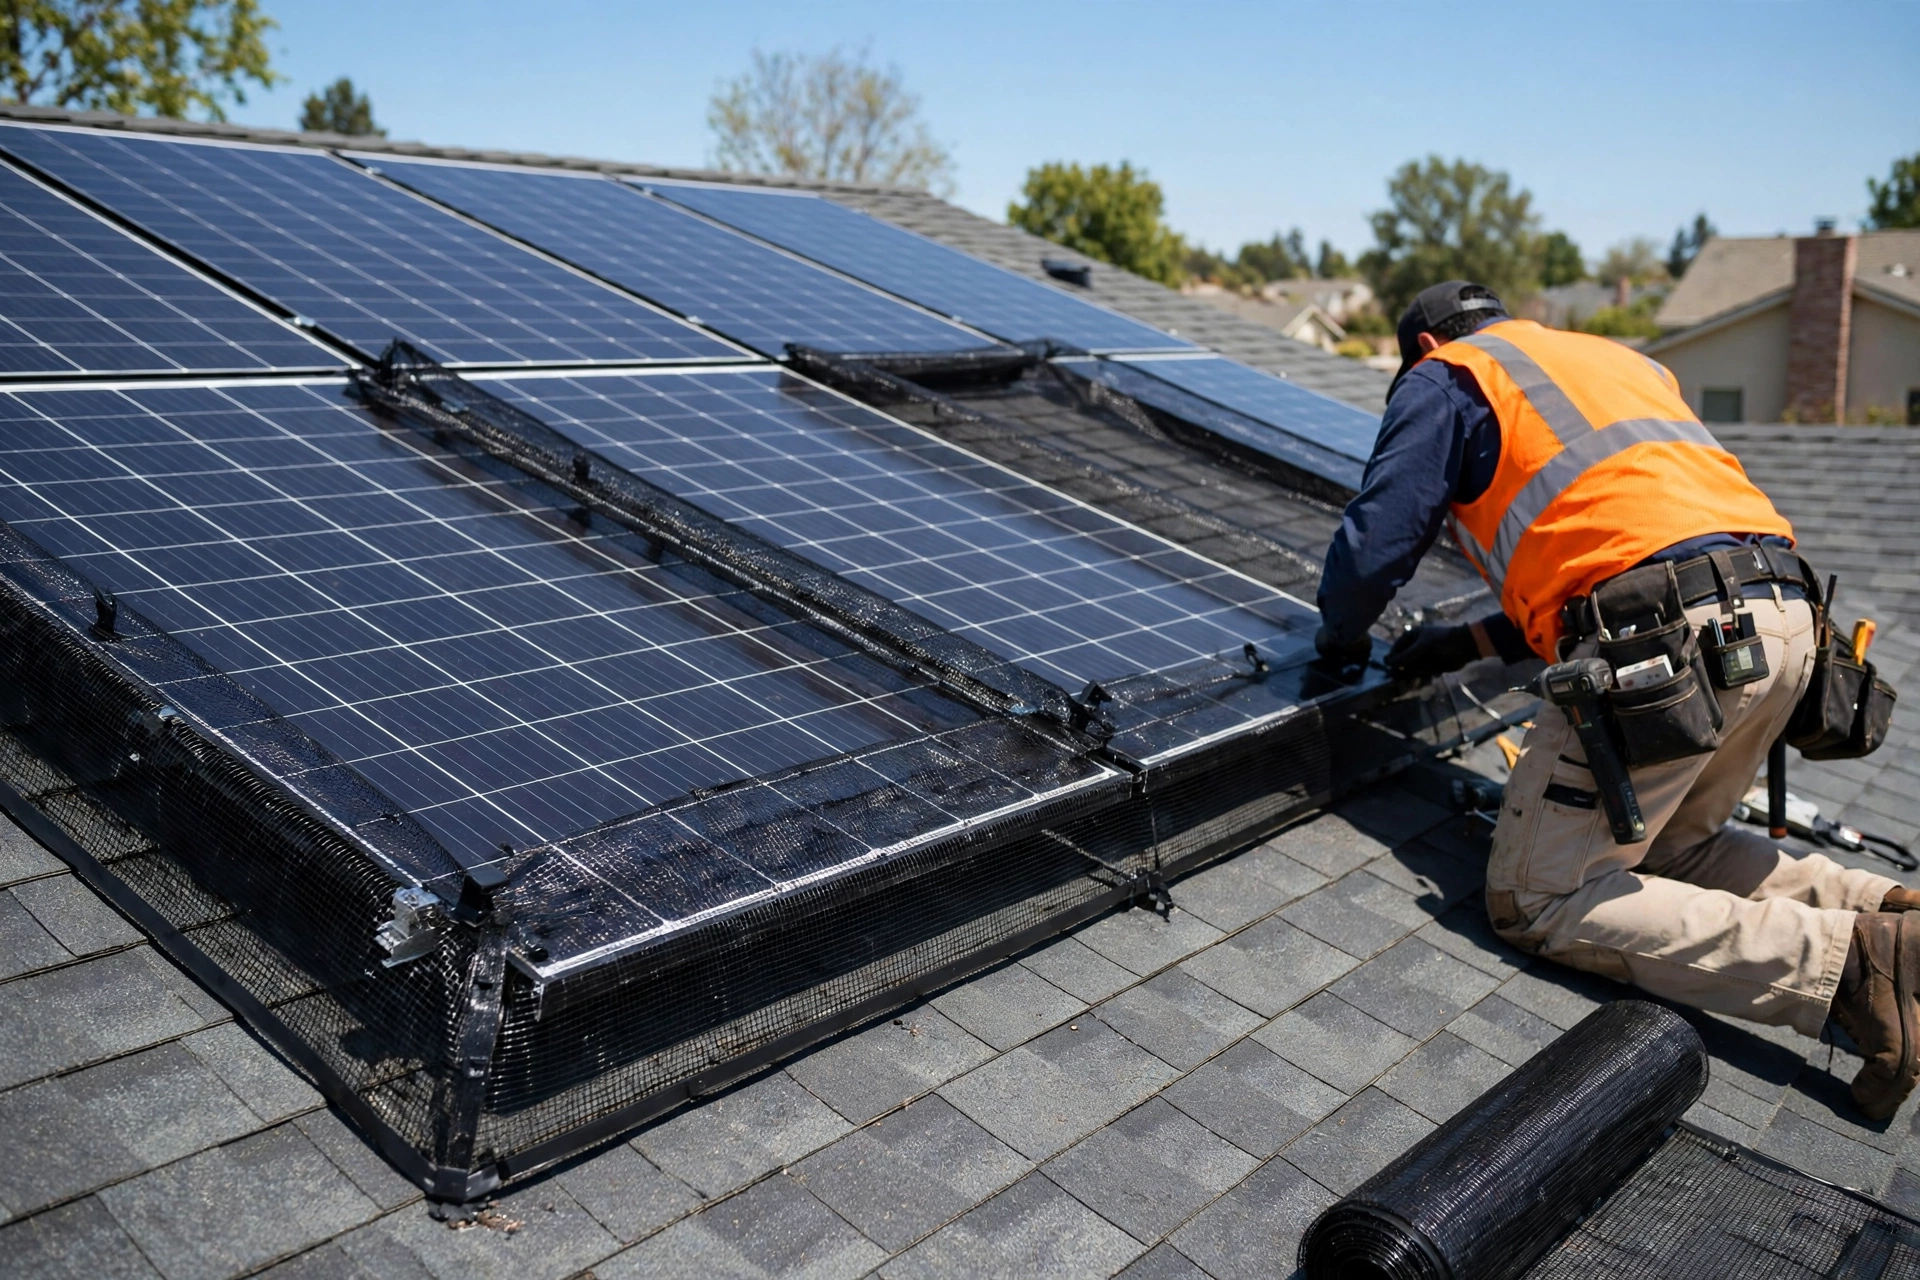
Perimeter mesh is the method professionals rely on most because it addresses the actual entry point. A continuous screen closes the gap between panel edge and roof around the whole array, so birds cannot reach the cavity, while open mesh lets air circulate beneath the panels.
Choosing the Right Mesh Material
- Galvanised steel mesh: A durable, corrosion-resistant default for most roofs. Heavier-gauge welded mesh resists bending better than thin rolls.
- Powder-coated or PVC-coated mesh: The same steel core with a dark coating that blends with black frames. Check it is rated for outdoor and UV exposure.
- Stainless steel mesh: The longest-lasting option in coastal or harsh conditions, at higher cost.
Avoid plain plastic mesh as the main barrier: birds and squirrels can chew through it, and cheap plastics go brittle in sunlight. Choose an opening small enough to exclude pigeons — commonly around 25 mm (about 1 inch) — and mesh stiff enough to hold its shape over curved tiles.
How Mesh Is Fitted With Clips
Good mesh systems are fixed without drilling into the panel frame, because drilling can void the warranty. The usual sequence is: measure the full array perimeter and the gap height between panel edge and roof; cut mesh into manageable lengths on the ground and bend the lower edge so it follows the roof surface closely; slide purpose-made solar clips onto the panel frame lip, spaced regularly along each side; hook the mesh onto the clips, push the locking washer home, and trim excess clip rods and sharp ends; overlap adjoining sections instead of butting them together.
Corners and Gaps Decide Whether Mesh Works
Most mesh failures happen at corners, ends, and obstructions such as mounting feet or cable exits, not on straight runs. Cut and fold mesh carefully around corners, add patch pieces over any openings, and check the whole perimeter. A gap of even a few centimetres is an invitation — pigeons probe weak points persistently.
Bird Spikes, Sealants, Skirts, and Other Supporting Methods
Where Bird Spikes Help — and Where They Do Not
Bird spikes are rows of blunt vertical pins fitted to ledges, ridges, and perching points. They make a surface uncomfortable to land on without harming the bird, and fitted on the ridge above an array they can reduce general bird pressure on the roof. They are not a substitute for mesh: pigeons can walk around strips, nest between them, or drop into the cavity if the under-panel gap stays open. Use spikes only as a supporting measure.
Sealants, Solar Skirts, and Panel Blockers
Flexible sealants and foam or rubber edge strips can close small, irregular gaps around panel edges, cable entries, and junctions where mesh is hard to shape. Use only products rated for outdoor, high-temperature roof use, apply them sparingly, and never seal so completely that ventilation or drainage is blocked. Solid aluminium solar skirts and clip-on panel blockers close the perimeter with a continuous edge instead of mesh; they can look neater, but cost more, must match the frame, and fail if any section is left off. Decoys and reflective tape may help briefly, but birds habituate to them.
What Solar Panel Bird Proofing Costs
All figures below are estimates only. Prices vary by country, panel count, roof height and pitch, and cleaning needed, so get itemised local quotes.
- DIY mesh kit: Often estimated in the low hundreds for a small array, mainly materials.
- Professional mesh installation (estimate): Commonly estimated at roughly £300–£900 in the UK, or a similar few-hundred to over-a-thousand range in US and Australian dollars, for an average home system.
- Cleaning and extras: An established colony, heavy fouling, steep access, or a solid skirt instead of mesh can push the estimate higher.
Proofing fitted when panels are first installed is usually cheapest, because access equipment is already on site and no cleaning is needed. Compared with repeated cleaning, wiring repairs, or lost generation, one fitted barrier is normally the economical choice — but no installer should guarantee a specific saving or payback period.
Safety First: Roof Work and When to Call a Professional
Every proofing method here involves working at height, next to a live electrical system. Panels generate direct-current electricity whenever light falls on them, so never touch damaged wiring.
- Use a properly footed, secured ladder, keep three points of contact, and never lean beyond the rails.
- Work in dry, calm weather, wear grippy footwear, and never walk on the panels.
- Cut mesh on the ground where possible; edges are sharp, so wear gloves.
- Do not work alone at height.
Call a professional if your roof is steep, high, slate, or fragile; if there is an active nest or heavy fouling; if cables look damaged; or if the array is complex. A reputable installer will also confirm the legal position on any nest before starting.
Maintenance After Proofing Is Installed
Proofing is low-maintenance, not zero-maintenance. Check the perimeter once or twice a year — from the ground with binoculars, and during any routine clean — for lifted sections, opened corners, storm damage, or debris against the mesh. Clear leaves and moss at the panel edge. If panels need servicing, tell the engineer the proofing is there so sections are refitted, not left off. Replace brittle or corroded sections promptly rather than waiting for birds to find the weakness.
Final Thoughts
Solar panel bird proofing works when it does one job completely: close every route into the space beneath the array, after that space has been legally cleared and cleaned. Perimeter mesh with non-penetrating clips is the proven core, with spikes, sealants, and skirts in supporting roles. Your next step is simple — inspect your array this week, and if birds are present, get the nest status checked and arrange proofing before the next breeding season.
Frequently Asked Questions
What Is the Most Effective Method of Solar Panel Bird Proofing?
Perimeter mesh screening is the most effective method for most homes. Galvanised, powder-coated, or stainless steel mesh fixed around the array with non-penetrating clips blocks the under-panel cavity while preserving airflow.
Will Bird Proofing Affect My Solar Panel Output or Warranty?
Correctly fitted mesh should not reduce output: it sits at the perimeter, does not shade the cells, and helps protect output by keeping droppings away. Drilling into frames can void warranties, so clip-fixed systems are preferred.
Can I Remove a Nest From Under My Solar Panels Myself?
Only if the nest is empty and local law allows it. Active nests are protected in many jurisdictions — under the Wildlife and Countryside Act 1981 in the UK and the Migratory Bird Treaty Act in the US, for example — so a nest with eggs or chicks must be left until the young fledge.
Do Bird Spikes Stop Pigeons Nesting Under Solar Panels?
Not on their own. Spikes deter landing where fitted, but they do not close the under-panel gap, and pigeons can nest between strips. Use spikes to support mesh, not instead of it.
How Much Does Solar Panel Bird Proofing Cost?
As an estimate only, a DIY kit for a small array may cost in the low hundreds, while professional installation for a typical home system is commonly estimated at roughly £300–£900 in the UK, with comparable few-hundred-dollar ranges in the US and Australia.
How Long Does Solar Panel Bird Mesh Last?
Good galvanised mesh commonly lasts many years, and stainless steel lasts longer still, especially in coastal areas. Powder-coated finishes degrade faster in strong sun, so check once or twice a year for lifted sections.
Can I Fit Solar Panel Bird Proofing Myself?
Yes, if your roof is low, simple, and safely accessible, you are confident at height, and the cavity is legally empty and clean. Use a clip-fixed kit and never drill into frames. For steep, high, or heavily fouled roofs, professional installation is safer.